
Howdy, folks! Has it really been three years since I posted here? Yikes!
Yes, I’m still alive–or perhaps I’m alive again, at least in terms of Freedom Force modding. It’s been an insane few years for the Greys, with a great many challenges and a great many blessings. Without boring everyone (or anyone who still happens to be following this blog) with my life story, the short version is we faced some significant disappointments, but they were followed by massive, trying, but extremely rewarding changes. After years of searching, I found a full-time teaching position as a professor of literature, which led to us uprooting the lives we’d been building for a decade and moving across the country. My new position has been incredible, and I have loved pretty much every minute of it. Yet, there have been quite a few minutes, and it has proven to be a lot more demanding than I expected.

I didn’t realize how much more full my life would be with a full-time position, and I find myself making up for lost time, investing in students, starting new programs, building new classes, publishing, and doing all kinds of fun things. We also bought a 150-year-old house and have been busy renovating it. There are endless projects, both work and home related. The cost of all of that, though, and the desire to do my new job as well as I can, is that it eats up pretty much all of my spare time. Getting started at a new institution, designing new classes, and often having to balance multiple preps has led to a really intense workload here in these first few years, with pretty much each semester being composed of 80-hour weeks. This semester, with only three preps and only one new class, was easier, but that still translated into around 50-60 hours a week, ha! The work is amazing, the students are fantastic, and my career is finally taking off, but I’m afraid this has left me with little time for FF…or sleeping!

Fortunately, for the first time in years, my summer is actually a little lighter. I’m not moving, searching for jobs, hustling for work, traveling for months at a time, or doing any of the other thousand things that have filled my summers for the last several years. I do have a major professional project I’m working on, as I’ve been asked to revise my dissertation for publication, but I still actually have at least some time to spend on my hobbies, which has brought me back to FF at long last. I have grand plans, and although I don’t know how far I’ll get, I intend to work on my Saturday Morning Adventures mod, creating a giant combo mod featuring all of the greatest stars and settings of classic 80s cartoons, including, (at least) the Ninja Turtles (with the Mighty Mutanimals), the Thundercats, the Silverhawks, He-Man, Transformers, and G.I. JOE. Believe it or not, I actually have most of the resources I need for this, thanks to the amazing work of the FF community, especially Deanjo2000, RandomDays, Style, and several others, including our dearly departed friend, Daglob.

Before I dive into that mod, though, I’m doing a quick update of my Pulp Adventures mod. A fan recently pointed out a few texture issues, and while I was poking around inside the mod, I started thinking about what else needed fixing, including several recurring complaints that I never got around to addressing. In my efforts, I managed to sort out everything that I’ve run into, with one galling exception, and it’s a problem that has been plaguing me and other modders for ages. This leads me to the second subject of this post, a brief developer’s journal, so I can share a really simple and effective fix I figured out for an annoying issue.
Pulp Adventures Developer’s Journal
If you’ve ever downloaded the amazing FF1 Mappack for FF2 that the inimitable GogglesPizano created years ago (and if you haven’t, you’re missing out on a tremendous and rich set of resources for your FF gaming!), then chances are you’ve run into this issue, and even if you haven’t downloaded the Mappack, if you’ve played Pulp Adventures, unfortunately, you’ve run into it there. You see, there’s this weird and, as far as I know, entirely inexplicable issue with some of the FF1 maps, especially the city maps, where they will have strange pathing issues with certain areas. For example, there are several of the city maps that have what are apparently invisible lines that characters simply will not walk across at a particular spot of the street or a particular alley. Instead, characters will run all the way around a city block or do any other number of fool things, rather than cross that invisible line. I have no idea what causes it, and thus, I had no idea how to fix it.
This is a particular issue for PA because, given my luck, I had happened to design several of my missions with encounters that sent the players into fights that would have them walk right across those lines. Thus, players had the frustrating experience of ordering the Shadow to go punch bad guys, only for him to head off on a tour of the city rather than cleaning a thug’s clock. This was particularly frustrating for an encounter involving a bomb and a ticking clock. After poking around the map’s .nif files and finding nothing that seemed to explain the issue (not that I’d necessarily know it if I found it), I gave up and just decided to redesign the maps, putting buildings over the invisible lines and moving things around. It was an awkward, unsatisfying solution, but it was all I had.
Until I started thinking about the map experiments I was doing with the DCUG mod, in particular, the Aquaman campaign issue with the oil rig. I had endless pathing problems with that particular nightmare until I just copied pieces of the flat terrain of the map and pasted them onto the top of the oil rig, after which everything worked like a charm. I realized that I could do the same thing with problem spots on the maps I was using in PA. And lo and behold, it worked! So, here’s how you can very easily fix these weird little glitches with pathing in FF1 maps.

Let’s take FF1 mission #14, the university, as an example. This is one of my favorite maps, as it has a cool and rather unique aesthetic to it, different from many of the city maps, and I’ve used it in several of my mods. However, there’s this spot, right in the center, where there’s one of those freaking invisible lines.

Right at the cool little plaza in front of the library building, there’s this weird spot where characters simply will not cross over from the sidewalk to the brick area. Instead, they’ll run way out of the way. For the pulp mission set here, that means they’re getting shot to pieces by the bad guys parked on that plaza. So, to fix it, I opened the map nif itself, going to my art/library/area_speciff1/city/terrain folder and looking for the mission file. Note, I only have that particular directory because I have installed the Mappack (or one of my mods that uses it). Then, I opened another map with nice, big, flat terrain pieces. Any such map will do, but I chose one of the MP blank maps. You’ll find those in Art/Library/terrain.
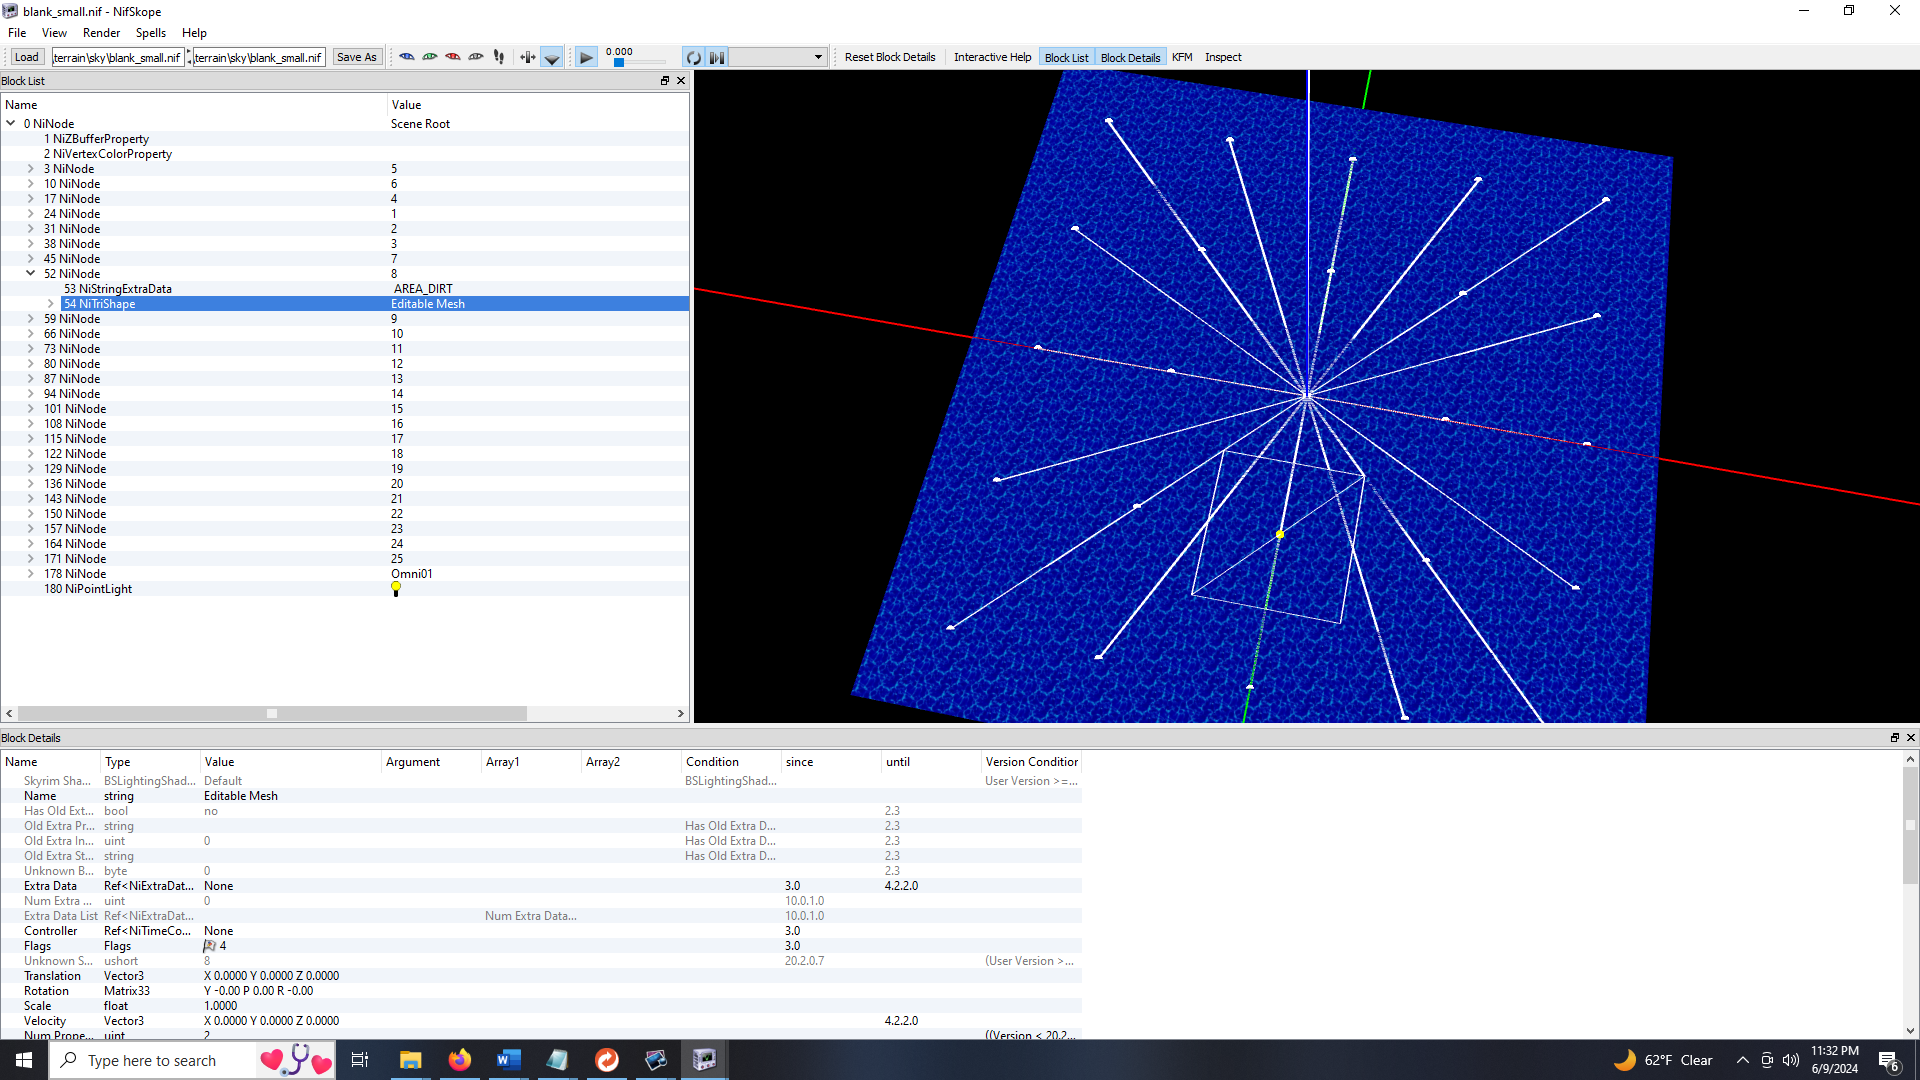
On my replacement map, I just selected one of the terrain pieces (any will do, as they’re all the same), and right click / copy branch. Then, I came back to my mission map, selected the trouble spot, and looked at the data tree to find the node that the spot was connected to. In the image below, you can see the “42NiNode,” the parent that has the various map pieces that include the spot I’m concerned with.

Next, I just pasted my piece from my other map to that parent node, not to the map piece in question. This connects my new piece to the structure of the map as a whole and makes sure it actually shows up where I put it, rather than displaying in some funky way I don’t expect. Now, this will show up flush with the rest of the terrain on the map, which won’t necessarily do us any good. However, as I discovered working on my Aquaman map, if you put one terrain piece ABOVE another piece, the higher one gets priority and becomes “the floor.” Thus, it’s a simple matter of right-clicking on the “Editable Mesh” entry for your new piece, selecting “Transform,” and raising the piece just one increment above the rest. Then, you can simply flag it as hidden, because the game doesn’t have to be able to “see” it to interact with a terrain piece. Viola! Now, my characters can cross that invisible line without batting an eye, and my missions can work as designed!

I had already posted this piece, but I find that I need to add one final note, as I just remembered that I skipped a step that is important if you’re performing this fix for a mod (it may also be necessary for general use; I’m not sure). You see, the maps get their layout info and their basic setup (buildings, cars, etc) from their level layout, level.txt. I always include these in my mods, just to have them on hand, even though the game doesn’t necessarily need them after the mission is built. Because missions get populated from these files, including the map nif itself, in order for the game to start using your altered nif, you may need to update the level layout entry for the map in FFEdit.

Now, there’s a weird little mystery surrounding this entry in the FFEdit mission tab. If you open up your mission and look at what it says there for “Level Layout,” chances are it will point to a directory you don’t have and, in fact, have never had. As best as I can figure, this reflects the directory from the last time the map was populated from the level layout file, and you don’t need to mess with it unless you’re messing with that file, like when you change the map nif, change datapaths, or do other kinds of monkey business. For this fix, we’ve obviously changed the map nif, and what’s more, we need to make sure the game is looking in the mod folder for the new one. Fortunately, this is very easy to do, though it comes with a set of possible complications.
Before we can get this thing pointed at our newly fixed map nif, we’d better check on that level layout file, make sure it’s okay. You see, if it’s from an FF1 map, we might need to update its datapaths to the setup we’ve got for FF2. So, head to your level layout directory (I put them in Art/level layout in my mods), find the right map folder, then open the level.txt. If you’re not sure which map is the right one, you can find this by reading the current info in the Level Layout box in FFEdit. In the file, you’ll find a bunch of entries telling the game what should go on the map, starting with the map nif itself at the top. If you’ve got an FF1 map whose level.txt hasn’t been updated, you’ll find that the datapaths tell the game to look in the area_specific folder for all of its assets. That’s a problem, because the Mappack put all of the FF1 assets in area_speciff1 to simplify things. Fortunately, this is a super easy fix. Just use the Replace function to change all the area_specific entries to area_speciff1.

Here’s where we find one more wrinkle, though. If you’ve already edited your map, loading in the level layout from the level.txt will overwrite all the changes you made to the layout objects, like the buildings and such (the stuff that you have to check the “layout” button to change in FFEdit. You can selectively edit the level.txt to remove anything that might screw up your map, if you can remember what you’ve done. I definitely ended up having to recreate some of my changes because I wasn’t sure what I had changed, but it was worth the trouble to fix the pathing issue. Anyway, if you’ve sorted that out, all you’ve got to do is go back to FFEdit and click that “Import” button next to the Level Layout box, travel to the proper directory, find the right map, then select the level.txt in its folder. The map will re-populate, using the correct nif, and you’re all good.
